Troubleshooting Manual
Troubleshooting Manual
Outdoor equipment are often subject to the harsh conditions of fluctuating weather, heat and rainfall – this can lead to minor issues with your mower once in a while. Fortunately, most of these problems are fixable without you having to take your unit to a service center.
Be Safe!
Ensure that you’re experienced with working on power tools before attempting to carry out any repairs on your mower. If you’re not comfortable with operating on your unit, don’t hesitate to take to a service center for inspection. Ensure that you practice adequate safety precautions every time you use the mower:
- Ensure that you’re familiar with all the mower’s parts and switches before you mow for the first time
- The machine’s sound levels can often exceed the 85 decibel mark so ensure that you have adequate hearing protection if you intend to mow for more than 15 minutes
- Inspect all attachments before you mow each time and make certain that they are all attached properly and securely
- Clear out accumulated clippings and other debris from the mower’s deck after every session
- Familiarize yourself with emergency controls, such as the quick braking and release
- Do not operate the mower in an area where there are children or pets – ensure that you have cleared the area of any other people before proceeding to mow
- Clear the mowing area of all obstacles such as toys and rocks before mowing
- Do not allow young children or inexperienced adults to operate the mower under any circumstances
- Never leave the mower’s key in the ignition after you are done with the machine
- Do not fuel the unit in a closed area, always ensure that refueling is only carried out in an open, ventilated space as gasoline fumes are potentially toxic
- If the fuel tank is hot, do not remove the fuel cap from the housing
- Fuel usually expands when heated so avoid filling the tank to the rim and ensure you leave a clearance of at least 6 mm from the top
- When removing the fuel cap, ensure that you unscrew it carefully as there may be a pressure differential between the chamber and the outside environment
- When using the mower after a long spell, ensure that you replace the gasoline with fresh fuel and discard of stale gas appropriately
- Always wear appropriate clothing and heavy footwear when operating the mower – do not operate the mower wearing loose fitting garments
- Operate the mower only under adequate visibility or in broad daylight
- Never allow anyone to ride alongside you on the mower – the unit is only designed to carry one person
- Ensure that you carry out all required maintenance operations at the recommended intervals as mentioned in your engine and mower guide
- When handling blades or attempting to operate underneath the mower, ensure that you wear gloves and wait for all moving parts to come to a stop after the engine has been turned off
Identifying the controls and instruments
Before using the mower for the first time it’s critical that you familiarize yourself with all the controls and where each switch or lever is location for easy access. Also practice the emergency stop function – never attempt to mow before thoroughly learning these basics.
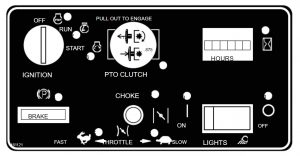
- Ignition turn switch: You will need to use the ignition starter switch in order to turn your engine on. Turn the key knob to the side to the ‘ON’ marking decal after inserting the key to start the engine. Release the switch as soon as the engine starts to avoid over cranking the starter motor.
- Mower Deck or PTO Switch: The PTO control lever switch is used to activate the PTO shaft and engage the blades, enabling you to mow.
- Choke button: Starting in cold conditions or when you need a higher fuel air ratio calls for the choke switch – you will need to set the to 1/3rd or ½ depending on the weather. Keep the button depressed when starting the engine and gradually release as the engine begins to run.
- Throttle Control Setting: You will need to adjust the throttle setting as mentioned earlier based on your mowing conditions. For normal operating conditions it is recommended that you leave the switch at the 1/3rd setting.
- Steering and drive levers: The mower has two levers which can be used independently or together in order to move the unit forwards, backwards or turn towards either side.
Grasshopper mower troubleshooting
Like any other grass mowers grasshopper mowers can develop some issues. You are free to use table below to determine most common issues and its remedy
Table 1 Most common troubleshooting solutions applicable for all Grasshopper Mower models
| Problem | Possible Cause | Solution |
| Drive system loses power | Drive system fluid level might be low | Refill the drive system fluid as instructed in the manual |
| Cooling fins and the cooling fan may be dirty | Clean out the cooling fins and the fan | |
| Hydraulic connections may be loose or leaking | Tighten all hydraulic connections rigidly | |
| Drive belt may not be tightly fastened | Fasten the drive belt tightly around the drive pulleys | |
| Pump bypass valve might be free-wheeling | Tighten the pump bypass valve | |
| No positive neutral position | The steering lever may need to be adjusted | Recaliberate the steering lever as per the manual |
| Linkage rods may have come loose | Re-install the linkage rods | |
| Engine refuses to crank | Battery may have become discharged | Recharge the battery or replace it |
| Battery’s terminals may have corroded or become clogged | Clean the battery’s terminals or replace if required | |
| PTO switch may be left ON | Turn the PTO switch to the OFF position | |
| Steering levers may be in neutral position | Shift the steering levers out of the neutral setting | |
| Steering levers may need to be adjusted | Recalibrate the steering lever as per the manual | |
| Loose wiring or damaged circuits | Inspect the wiring and circuitry | |
| Engine cranking but not starting | Fuel tank might be empty | Refill the fuel tank with fresh gasoline |
| The fuel line or fuel filter might be blocked | Clean out the blockage | |
| Loose wiring or damaged circuits | Inspect the wiring and circuitry | |
| Excessive vibration coming from unit | Blades may be damaged | Inspect the blades and replace if dented or broken |
| Blades may not be balanced | Inspect both ends of the blade and sharpen uniformly to attain right balance |
Grasshopper mowers maintenance
Like any other mowers, Grasshopper mowers need regular maintenance or/and service works to work properly over an extensive period of time. We have created a maintenance table showing maintenance activities over certain period of time.
Table 2. Grasshopper mower maintenance work table
| Interval | Task | Action |
| Daily | Visually inspect all components for damage or wear and tear | Replace any faulty components with authorized parts |
| Check the engine oil level | Fill oil if required | |
| Check the radiator’s coolant level | Refill the coolant if required | |
| Inspect hydraulic hoses | Replace the hoses if worn out or if there are any leaks | |
| Check air filter housing | Clean out the external housing of the air filter | |
| Check for debris or clippings | Clear out clippings and debris after each use | |
| Weekly | Check transmission fluid level | Refill fluid if required up to the marked decal |
| Inspect for leaks | Tighten all fittings above the leaking zone and replace faulty gaskets or sealants | |
| Check tire pressure | Pressurize all tires to equal pressure if not uniform | |
| Inspect blades | Sharpen the blades or replace them if required | |
| After 8 hours | Check rear wheel fittings | Lubricate all pivot points and joints with recommended lubricant |
| After 80 hours | Inspect half shaft | Ensure tight fit and lubricate all pivot points and joints with recommended lubricant |
| Inspect clutch shaft | Lubricate shaft and replace the clutch if worn out | |
| After 500 hours | Filter change | Replace the air filter |
| Fluid change | Change the drive system fluid |
Whenever you experience a problem with your Grasshopper mower and you are not able to fix it yourself, you should transport the mower to the closest service station where trained personnel will perform all repair work needed. Models under warranty fall under free model exchange or free repair
Mounting and dismounting the mower properly
Ensure that you only mount the mower from the left side of the unit – before you attempt to climb on to the unit, ensure that the parking brake has been set and that the PTO switch has been deactivated. Also make sure that the steering levers are in the neutral lock position – swing outwards. Step onto the deck from the ground with your left foot and then over the frame with your right foot, land your feet into the provided footrests on the anti-skid surfaces. Ensure that the mounting platform is always kept clean and dry after you dismount the unit.
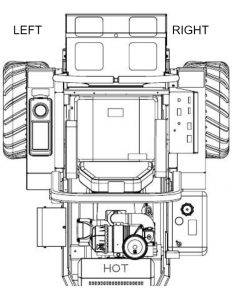
Once you’re done with the session, wait until all the mower’s moving parts come to a complete stop after you turn off the engine before you begin to dismount. You can use the left steering wheel to stabilize yourself while mounting or dismounting the mower, however do not attempt to support all your weight on it. The anti-skid surfaces must be replaced when they wear out or lose their friction.
Mowing on uneven terrain or inclined surfaces
As far as possible, avoid steep inclines and areas next to lakes or water bodies. The machine could roll over under steep inclines and cause severe injury to the driver. Evaluate the mowing terrain well before you proceed to mow and ensure that you always drive at the lowest possible ground speed when mowing on a sloped surface or uneven ground. Always start at the bottom of the slope gradually work your way up – if you feel the machine lose stability or are unable to proceed up the incline, abandon the attempt and cease operation. Note that the machine generally attracts greater traction when driving in the reverse direction. Do not put the mower in a position where you do not have enough traction to pull out from the incline or stop.
Tires are likely to lose traction on inclines and wet surfaces can make matters worse so always ensure that your lawn is dry before you attempt to mow, especially on uneven terrain. Never attempt to stop or start the unit suddenly when moving up or down an incline as this may cause the machine to tip forwards or backwards. Practice the utmost caution when steering to either side to execute a turn – never attempt to steer steeply when on a slope. Ensure that the area is clear behind you before backing the mower. If you feel that the mower is beginning to lose traction, turn off the PTO system to disengage the brakes before gently rolling down the incline. It is highly recommended that you consider purchasing counter weights if you need to frequently mow on sloping surfaces. Avoid using attachments like grass-catchers when you’re operating over a slope.
Operating the steering levers and movement
If you are not too familiar with how to operate a zero-turn mower, it’s recommended that you begin by first practicing the necessary steering controls and maintaining ground speed operations in a suitable open space. Begin by driving with a low engine speed and gradually work your way up the pace ladder. Learning to work with all these steering controls will improve your control and help you learn to operate the mower in a smooth manner.
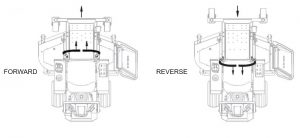
Moving Forward: In order to move the mower in the forward direction, you will first have to make certain that you have selected the appropriate travel speed using the transmission shift lever, or by gently moving the levers forwards – do not attempt to start at a high speed or by pushing the levers too far quickly as this may cause you to lose traction or damage the unit’s components. Now release the neutral latch lock before you slowly release both the left and the right steering and brake control levers. The further forward you push the two steering levers, the faster you dictate the mower to travel straight. In order to stop the forward motion, gradually pull the steering and brake control levers towards you until the unit comes to a halt. After this, proceed to shift the main neutral setting or neutral lock setting.
Traveling Reverse: Before attempting to move the mower in the reverse direction, ensure that you have deactivated the neutral latch and parking brake – also turn around and check that there is ample room behind the unit for you to safely back out. Never attempt to reverse onto a slope. Gently pull both levers backwards towards yourself in order to initiate the backward movement and gradually push the levers forward once you’ve attained the required position. As far as possible, always reverse at a low stable speed.
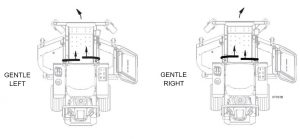
Steering Left: To steer towards your left hand side, hold the left lever stationary and gradually push the right lever forwards to initiate a slow turn. Always ensure that you do not turn too steeply when you’re on a slope or uneven surface. You can initiate a steeper zero-degree turn by pulling the left lever towards you and pushing the right lever forwards away from you – the further you push or pull these corresponding levers, the quicker your mower turns.
Steering Right: To steer towards your right hand side, hold the right lever stationary and gradually push the left lever forwards to initiate a slow turn. Always ensure that you do not turn too steeply when you’re on a slope or uneven surface. You can initiate a steeper zero-degree turn by pulling the right lever towards you and pushing the left lever forwards away from you – the further you push or pull these corresponding levers, the quicker your mower turns.